Showing posts with label baking. Show all posts

Friday, September 18, 2009

Ali's Kitchen: Apples For Rosh Hashanah

All right, you shiksas. This evening is the first night of Rosh Hashanah, the Jewish New Year. Two of the best-known culinary symbols of Rosh Hashanah are apples and honey. (If you didn't already know that, shame on you, and also you must never have read All-of-a-kind Family books in fourth grade.)

Accordingly, a very simple apple tart:

Take your basic pie shell recipe and cut to fit tartlet pans. (Notice how I actually bought some this time.) Blind bake at 375° for about 15 minutes, first brushing all over (not just the edges) with egg white, to create a waterproof layer. This will block out excess moisture from non-traditional pie apples, and keep your crust from being soggy.

Core and halve however many apples you need for however many tarts you're making. (Dough for one 10-inch pie shell makes dough for approximately 6 traditional French tartlet pans, so, 3 apples.) Slice each apple half into 1/4-inch thick slices, and lay each apple half right into a tart, trimming the ends to the apple fits easily. Sprinkle to taste with sugar, cinnamon, and any other spices you enjoy in apples pie. Brush the entire surface (apple and crust edges) with melted, unsalted butter. (I used less than 2 Tb for 6 tartlets.) Bake for just about 20-30 minutes at 400°. They should be golden brown, and the apples should be soft.


Note: These look pretty, right? But they're a little hard to eat without the entire apple halve trying to jump into your mouth in one bite. You can slice the apples both vertically and horizontally before baking and laying in the crusts, to make for easier eating. It'll still be pretty!

Happy New Year. ^_^

Tuesday, September 8, 2009

Ali's Kitchen: Anniversary Special: Baking

The past several days, I've been big on the baking. On Friday I snagged a Cioppino recipe from Cooking Light and set to making my own bread to go with it. I used a very basic recipe from How to Cook Everything:

3 1/2 c. flour
2 tsp salt
1 tsp yeast
Scant 1 1/2 c. water

The recipe calls for, when making by hand instead of a food processor since some of us do not have room in our kitchens for food processors, mixing half the flour with all the salt and yeast, then stirring in all the water. Add the rest of the flour until completely mixed and just cohesive enough to knead. Knead, using minimal flour for surface and dough, for 20 minutes, until much firmer and more elastic, but still quite sticky. Set in a bowl and cover tightly with plastic wrap for 2-3 hours (or for a longer time, if you're going for sourdough). When the dough has approximately doubled, cut into 3 or 4 sections, roll into balls, and let sit under a towel for about 20 minutes. Flatten each dough ball into a disc, then fold the disc over on itself twice, sealing the seam each time. Roll (again, on a lightly floured surface) into ropes and place, seam side up, on a sturdy piece of cotton (such as a clean tablecloth). Fold part of the cloth over the dough and allow to rise for another 1-2 hours. 30 minutes prior to baking, preheat the oven to 450. Just before baking, slice the tops of the dough several times, and spray the inside of the oven to create steam. Bake for five minutes in the center of the oven, and spray again at 5 minutes to create more steam. Bake for another 25-30 minutes, until the tops are golden brown.


See that? That's too damn skinny for a baguette. The flavor was good (I added herbs and garlic into the fold-and-roll step), but they were too dense, and very chewy. If you Google this problem, you'll find suggestions from "too much kneading" to "not enough kneading" to "too much extra flour during kneading" to "not enough flour during kneading." So I had no idea what I really did wrong, though I suspect it had something to do with too much extra flour and not enough kneading time. BUT APPARENTLY YOU NEVER KNOW. You know what I noticed when I went to make the bread again tonight (Tuesday)? The How to Cook Everything recipe calls for rapid-rising yeast. I have plain old traditional yeast. That maaaay have had something to do with it. So guess what I did today when baking this same baguette again to go with anniversary lobster? I used the whole packet of yeast (about 1 Tb). Guess what? That worked juuuust fiiiine. They were still a little chewy, and the crust is so crusty it would make a Frenchman wince, so I've clearly still got some figuring to do. But, on the whole, don't these look basically like baguettes?


Since tonight was our second anniversary, I made a special dessert. Whereas last year I did a cake that attempted to recall our wedding cake, this year I've been baking muffins and cupcakes so often that I wanted to do something a little different. Enter Alice Waters' The Art of Simple Food and her lemon curd made with pâte sucré tartelettes. They didn't come out particularly prettily, but that's my own fault for not shilling out the bucks for tartelette pans and using muffin tins instead. (Yeah, I really did. lulz.)

The raspberry was my idea, thankyouverymuch. ^_^


Pâte Sucré
from Alice Waters' "The Art of Simple Food"
Beat together until creamy:
8 tablespoons butter
1/3 cup sugar
Add and mix until completely combined:
1/4 tsp. salt
1/4 tsp. vanilla extract
1 egg yolk
Add:
1 1/4 c. all-purpose unbleached flour (*I used whole grain pastry flour instead*)
Mix well, stirring and folding, until there are no dry patches. Chill for at least 4 hours, until firm. Roll out between two sheets of floured waxed paper. Roll out to about 1/8 in. thick, popping it into the freezer briefly if it becomes too stick to work with while rolling. Cut out the dough according to the size of tarte, tartelette, etc. I ended up using an old cocktail glass dipped in flour, which was about the right size for muffin tins. Press the dough gently into your baking container, sealing any cracks with extra dough. Trim excess dough at the top by gently pressing with thumb and index finer. Chill the dough for at least 15 minutes before baking. Bake the chilled shells in a preheated 350 degree oven for 15 minutes, or until an even light gold in color. Halfway through the baking, remove the tart shells from the oven and lightly pat down any bubbles that may have formed.

Lemon Curd
Wash and dry:
4 lemons
Grate the zest of one of the lemons on the small holes of a grater. Juice the lemons; there should be about 1/2 c. juice.
Beat until just mixed:
2 eggs
3 egg yolks
2 Tb milk
1/3 c. sugar
1/4 tsp salt
Stir in the lemon juice and zest and add:
6 Tb butter, cut into small pieces
Cook the mixture in a small nonreactive heavy pan (*I used a Paul Revere stainless steel saucepan - which are relatively light and copper bottomed on the outside. This is apparently a nonreactive pan, which I discovered when I actually made the stuff, because I'm daring like that.*), stirring constantly, over medium heat until it is thick enough to coat a spoon. Do not boil or the eggs will curdle.

This is where I deviated: I believe Waters would have you pour the curd into the pre-baked pastry shells and cook at 375 only until the curd is set - before it has thickened completely in the pot. I let it thicken completely then cook to an almost cheesecake-meets-lemon-bar consistency, about 20 minutes. THERE. WERE. SO. GOOD.
Because of my funky tartelette sizes, I ended up with a bit of extra lemon curd, so I poured that into some pretty teacups (which Courtney gave me for my bridal shower), topped with some extra lemon zest, and a couple of blackberries.

However you're enjoying lemon curd, make sure you chill it for at least 2 hours before serving. Paradoxically, you need to take it out of the fridge at least an hour before serving. Now figure *that* one out if you have to cook-then-serve. I made them about 24 hours before eating, and they were fantastic. Definitely great for a celebration!

Le yum yum!


Tuesday, August 4, 2009

I got to thinking today: "If one cannot afford to go to the tropics in this economy, ought one not at least have a taste of said tropics?"

"Yes," I decided, "one ought."

Hummingbird Cupcakes
with cream cheese frosting
(if I changed something, that ingredient is marked with *)

For cake:
Preheat oven to 350° F.
Sift together in a medium bowl:
*1 1/2 c. cake flour
1/2 tsp. baking soda
1/2 tsp. cinnamon
1/4 tsp. salt
Beat together in a large bowl:
*3/4 c. Smart Balance Light butter substitute, softened
1 tsp. vanilla extract
*1/2 c. Splenda Brown Sugar Blend
Add and whisk until fluffy:
1 large egg plus one white or yolk
Combine in a large bowl, then stir into egg mixture:
2 ripe bananas, mashed
1/2 c. unsweetened, drained, crushed pineapple (canned in pineapple juice)
*1/2 c. sliced almonds
Stir flour mixture into egg mixture. Divide into cupcake cups, and bake about 26-28 minutes, rotating from the top rack to bottom rack about halfway through.

For the frosting:
All ingredients should be room temperature.
Cream together until well-blended:
*6 oz. reduced fat plain cream cheese
3/4 stick of butter
1/2 tsp. vanilla extract
Gradually add:
3/4 lb. confectioner's sugar

Notes on some of the changes:
I used almonds instead of walnuts or pecans because we already had them, and because they pack a little better nutritional punch than pecans do. I'd wager a guess, though, that macadamia nuts would be awesome.

I omitted coconut from the recipe because the only coconut I could find was already sweetened, which would make each one of these cupcakes face-scrunchingly sweet, even if you rinse off the pineapple, cut the sugar content, and use unripe bananas. We still got the coconut kick, though: instead of topping with a pretty pineapple blossom (though I do intend to do that one day, since it's so cute), I sprinkled some coconut on top of the iced cupcakes.

Finally, the reduced fat cream cheese works just. fine. From some recipes I've seen around teh Interwebs, you can probably even use fat free and get away with it with extra time for mixing out the lumps.

Voilà! Tropical tastes even if you're stuck in a moderate climate. Le yum yum!

Saturday, July 18, 2009

Ali's Kitchen: Fresh Fig Scones

I love scones. I love them. I love them so much. So very, very much. I love scones.

I love figs. I love fresh figs. Fresh figs are pretty much the epitome of fruit, as far as my tongue is concerned.

I baked some scones. With figs. I love them. I want you to love them too. Love is good, as are scones and figs. Spread the love.

The basic recipe comes from p. 275 of my lovely copy of The Art of Simple Food by Alice Waters. As per usual, I modified it to make it lower fat, and of course used fresh fruit instead of dried fruit, one of her great basic-scone-dressing-up suggestions. Now, either one or both of those alterations made the dough rather tough to work with. I imagine that, had I been patient and refrigerated the dough before kneading as you do with bread doughs, it would have been a heckuva lot easier to work with. But, they were scones, with figs, so waiting really wasn't in the cards. I'm sure you understand. Don't judge me, monkey*.

Preheat the oven to 400º
Measure and mix together in a large bowl:
- 2 cups unbleached whole-wheat flour (original recipe calls for pastry flour; I didn't have any; scones will simply be heavier)
- 2 1/2 teaspoons baking powder
- 1/2 teaspoon salt
- 1/8 cup Splenda Brown Sugar Blend (original recipe call for 1/4 cup sugar)
- 3/4 cup figs, chopped into 1/4-inch pieces

Stir in:
- 1 1/3 cups skim milk (original recipe calls for 1 1/3 cups cream, which I swear I would have used, but we didn't have any)
Mix until the dough just starts to come together; it will be sticky. Turn it out onto a floured surface and knead briefly, just enough to bring the dough completely together. (Remember the basic kneading rule: if it's too sticky, sprinkle on more flour as you go; if it's too dry, sprinkle in some extra milk or water.) Pat it into an 8-inch circle. Brush with:
- 2 tablespoons Smart Balance Lite, melted (original recipe calls for butter)
And sprinkle with:
- 1 tablespoon Splenda Brown Sugar Blend (original recipe calls for 1 1/2 tablespoons sugar)
Cut the circle into 8 wedges and place the wedges 1 inch apart on a baking sheet lined with parchment paper. Bake for 25 minutes for my recipe, 17 minutes with the original recipe, or until golden brown. Common sense tells me that the extra moisture in the fresh figs (as opposed to dry additional ingredients) was responsible for the extra time, but I'm really just making that up.

Voilà:

Le yum yum!

* I will send you a scone (some day) if you can name that movie reference.

Wednesday, June 10, 2009

Ali's Kitchen: Consume Some Time-Consuming Peach Pie

If someone tells you to save pie-making time by using a pre-made crust, then he or she is a jerk. What the jerk is not telling you is that there is no way to NOT spend a lot of time on a pie, because cutting up alllll that fruit is going to take you a looong time anyway. So tell the jerk that you've seen through their pathetic attempts to imbue your baking efforts with false hope, and that you'll be making your crust from scratch, thankyouverymuch, following the Alice Walters classic The Art of Simple Food. From pages 174-5:

"Have measured 1/2 cup ice-cold water. Mix together 2 cups all-purpose unbleached flour*, 1/2 teaspoon salt. Add 12 Tb cold butter, cut into 1/4-inch cubes." Cut/work the butter into the flour until moist, then add most of the water until the mixture becomes, well, dough-like. Divide the dough into two spheres, wrap in plastic, press each into a disk shape, and refrigerate for at least an hour. When it's time to roll, flour your counter or board. Press the disk thinly while still in the plastic, then remove the dough from the wrapping and flour the top side. Roll out until a little thicker than 1/8-inch, which should give you approximately the right size to line a 9-inch pie dish. Refrigerate (on wax paper or parchment paper) again so it's easier to work with. Repeat with the 2nd disk of dough. Pre-baking is optional, I believe, and if you choose to do so Walters recommends 375 degrees for about 15 minutes (lined with parchment or foil, weighted with dry beans or other pie weight), then about 5 minutes without the lining.

* I used whole wheat flour, which worked just fine.

I'm not going to type out all of pages 174-5 because a) that's probably copyright infringement, and b) that's a lot of typing. My suggestion is that you go out and purchase The Art of Simple Food right the heck now, because Walters has simply the clearest, easiest-to-follow instructions of any chef out there. Not only are her step-by-steps easy to figure out, but she also includes all kinds of substitutes and contingencies in her recipes. So there you have your basic crust recipe.

If you're like me, you'd think, "Well, while the dough is refrigerating pre-rolling, I'll cut up the peaches and then I'll have plenty of time to clean up because cutting cling-free peaches won't take very long, especially since I'm not peeling them, since peach skins are awesome." This assumption, unfortunately, is based around trusting your grocery store's produce section to properly label cling-free versus cling-stone peaches. If you find that the produce manager has no idea how to differentiate between the two kinds of peach, you have my full permission to find him or her and present them with a lovely banana cream pie. In his or her face. Just don't get arrested for assault.

For the filling and baking time, I pulled the basic Peach and Other Stone Fruit Pies recipe from Mark Bittman's How to Cook Everything (p. 689-9).

About 2 lbs. peaches, sliced about 1/4 in. thick (I used a little bit more; and if you're not going to peel them, rub off the fuzz with a clean dish towel)
1 Tb lemon juice (I used Key Lime juice which worked just fine)
1/2 c. sugar (I used 1/4 c. Splenda Brown Sugar Blend which was the perfect amount for my not-quite-totally-ripe peaches)
1/2 tsp almond extract
1/8 tsp nutmeg
1 1/2 Tb cornstarch
Milk or egg whites

Preheat the oven to 450. Toss the sliced peaches in the citrus juice. Mix the sugar, almond extract, nutmeg and cornstarch together and toss the mixture into the peaches. Pour fruit mixture into the pie pan (which now, naturally, has one of your pie shells in it). Cover with the second pie shell. I cut my second pie shell into a little lattice crust. You don't need a fancy-shmancy pastry cutter for this, just a nice, sharp paring knife. Brush the crust with milk or egg whites as needed. (The recipe calls for milk, but I really recommend the egg whites instead - you get that nice brown, glazed glow.) Bake for 10 minutes at 450 degrees, then reduce the temperature to 350 and bake for another 40-50 minutes. (Baking with substitute ingredients, like the Splenda blend, tends to increase cooking time, I've noticed. It's hard to overcook a pie, so don't worry too much. If the crust starts to burn around the edges, cover it with aluminum foil while the center turns golden.)

If you discovered you had some extra dough left over after making your lattice crust, drag out the food coloring, get creative, and make yourself a little peach! (Or apple, if it's an apple pie, or cherry, blueberry, etc.)


Le yum yum!


Wednesday, April 22, 2009

Ali's Kitchen: Potato and Onion Gratin with Coconut Milk and Curry

We had some coconut milk around from a curry dish I made over the weekend, so I thought, "What can I do with this slightly less than a cup of coconut milk, lest I waste it and anger the gods for wasting something so tasty?" It was a real quandry.

First, I found this, which doesn't involve coconut milk, but seemed as though it would be complementary. (The mint in those beef patties is what makes it, by the way. The cumin overwhelms them a little so much so that the coriander isn't really apparent, but the mint is just the perfect little pop.)

Then, I realized that coconut milk is "milk," so why not treat it as such and make something of a gratin? And, since we're at it, why not throw some curry in there? Just because. Curry is awesome. (In this case, it was curry pounder, but I suppose I could also have used some Thai red curry sauce.) So we came up with:

- Preheat the oven to 400.
- Slice 2 small yellow onions into thin rounds and saute in a little vegetable oil, just until brown around the edges. Set aside on paper bags or paper towels to degrease a little.
- Mix together a teaspoon of minced garlic (about 1 clove, if you're using fresh because you don't mind having stinky little fingertips), the coconut milk, 1/2 - 1 tsp curry powder, and a pinch of salt. Set aside.
- Slice 2 large (Russet or other baking) potatoes into thin rounds.
- Layer the onions and potatoes in a greased baking dish (onions all in one layer, then potatoes on top; or onion/potato/onion/potato, up to you). Pour the coconut milk mixture over the top and pop it in the oven for and 1 hr 20 min, approximately. Just until the top is nice and crispy and brown.

Le yum yum.

Friday, March 20, 2009

Ali's Kitchen: Cupcakes on the Second Try

On Tuesday (St. Patrick's Day), a friend and I went on a pilgrimage to the Mecca of cupcakes: Magnolia Bakery.  The intent was to partake of a green cupcake to celebrate the "holiday."  (Extra points for choosing the location that's one block from St. Patrick's Cathedral.)  Magnolia came to prominence, as any solid SATC fan knows, through the creation of its now-hallowed red velvet cupcake.  As a good Southern girl (sort of), I of course love red velvet cake.  Unfortunately, the cupcake in question on the day in question left something to be desired (dry), probably due to the MOBS which descended upon the tiny bakery.  This was my first trip to Magnolia, and I suspect they simply weren't on their A game.

Today (Friday), I decided to try my OWN Magnolia Bakery red velvet cupcakes.  The recipe is available on Epicurious... or so Epicurious says.  Whatever that recipe was did NOT yield ANYTHING even CLOSE to being a successful cupcake, let alone a legendary Magnolia cupcake.  I couldn't even eat them, and into the trash they went, even though I felt bad wasting the food.  But trust me, even if there were some soup kitchen that accepted home-baked goods, these were so bad that I wouldn't inflict them on anyone, much less someone who is genuinely hungry.  With that rationalization helping ease my guilt, I went to work on a DIFFERENT batch of cupcakes (I had to buy buttermilk for the Magnolia recipe, and we'll never use it for anything else here).  This batch was FAR more delectable and, dare I even say, cupcake-like.

From Joy of Cooking, Buttermilk Layer Cake
From Ali's head, Buttermilk Layer Cake - The Cupcake Remix

First of all, I halved the recipe, because oh my God, we don't need that many cupcakes here.  Working in a small kitchen, I find it helps me to think in terms of groups when preparing a recipe.  The ingredients, with their amounts and in their groups, are:

A
1 c. plus 1/6 c. cake flour (not the self-rising type)
3/4 tsp. baking powder
1/4 tsp. baking soda
1/8 tsp. salt

B
6 Tb. unsalted butter, softened
4/6 c. sugar

C
1 whole egg, plus 1 yolk (or, plus 1 1/2 whites)
1/2 tsp. vanilla extract

1/2 c. buttermilk

Here's your method to make 12 cupcakes:

1.  Preheat oven to 350 degrees.  Make sure all your ingredients are at room temperature (60-70 degrees, that is).

2.  Sift group A together and set aside.  Beat group B on low or medium speed until nice and creamy, about 2 minutes.

3.  Whisk group C together (does not include buttermilk), then stir flour mixture (A) into the butter/sugar/egg mixture (B+C).  Alternate adding the flour mixture with the buttermilk, stirring each addition until smooth.

4.  Spoon into cupcake cuppies!  Bake in the top third of the oven for 20-25 minutes, or until a toothpick inserted into the center of a cupcake comes out clean.  Let cool COMPLETELY, then frost.  If you are actually inspired enough to make your own frosting, I applaud you.  I use Pillsbury reduced sugar vanilla, and add some of the leftover red dye from the disastrous attempt at red velvet cupcakes which were, again, a total and utter lie.  

Cupcakes:  Success

Le yum yum!

Thursday, December 25, 2008

Ali's Kitchen: Swedish Holiday Treats

Happy Holidays!

I am ALL about my [admittedly meager] Swedish heritage this year. I may only be about 1/16, but I know the name of my most recent Swedish ancestor (Maria Pollan, née Larson), so that counts for something, I figure. My Nana, who has had a very tough year, always identified with her Swedish heritage, if not necessarily in the kitchen. It'll be a fun, and for me meaningful holiday exercise to attempt a few traditional Swedish recipes.

A word about Swedish holidays:

St. Lucia's Day
Lussekatter
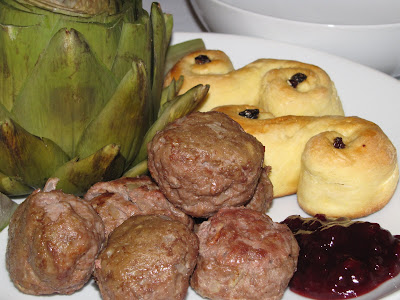
On the feast day of St. Lucia, little Swedish girls (and Norwegian girls and Danish girls and Italian girls and a bunch of girls) dress up in white gowns with red sashes, wear wreaths with burning candles on their heads (yeah, really) and pass out the Christmas presents. You know this if you, like me, had the American Girl Doll Kirsten Larson, who was a plucky Swedish immigrant in 1854 (or something). Kirsten had a St. Lucia's Day outfit, and I think the outfit even came with a little plastic lussekatt, the saffron bun baked and eaten on St. Lucia's Day night. It all sounds terribly cute until you consider the fact that the wreath with candles is supposed to symbolize the *fire that wouldn't burn St. Lucy after she was sentenced to death*. Isn't that festive? I pulled the below recipe from a website to which I will NOT link, because they had all kinds of typos and it was just generally an "off" recipe, so I had to modify.

Jul/Midwinter
Glögg
The Yule is celebrated on December 24th in Sweden, though it's also tied to the old Germanic pagan festivals related to the Winter Solstice on December 21st. This is the day when Swedes tie one on and really enjoy their version of spiced mulled wine: glögg (pronounced something like "glug"). There are so many various recipes for glögg that you can feel free to assemble the main ingredients and use them in whatever proportions please you best.

Any Swedish Holiday At All
Köttbullar
Swedish. Meatballs. 'Nuff said. Always, always served with lingonberry preserves. Seriously, in Sweden if you try to eat köttbullar without lingonberries? They will arrest you and beat you. I've provided the classic preparation from Fresh Direct, but I'll outline my method, too.

LUSSEKATTER
(Saffron Buns)
INGREDIENTS
1/4 teaspoon saffron threads 1 cup milk 1 tablespoon yeast 1/2 cup sugar 4 ounces (1 stick) unsalted butter 5 cups all-purpose flour 1 teaspoon salt 2 large eggs, beaten 1 beaten egg white for egg wash
PREPARATION
Pound saffron threads to break down strands. (Ali note: Or just tell the people reading your recipe to get saffron powder, jeez.)
In a small saucepan, heat milk to lukewarm.
Mix yeast with 1/4 cup milk and 1 tablespoon sugar. Set aside.
On low heat, melt butter in saucepan with milk. Add crushed saffron. Let cool.
In large bowl, mix together flour salt and remaining sugar.
Stir yeast into cooled milk mixture. Mix into dry ingredients, beating to mix well. Add beaten eggs.
Knead in bowl for 5 - 7 minutes. (Ali note: Kneading in the bowl is somewhat confining. After the eggs are mixed in well, feel free to jump right to your floured board, or counter, as the case may be.) Turn onto floured board and knead another 7 - 8 minutes. (Ali note: If it's sticking to your little fingers, try adding a bit more flour to your board or counter; that’ll mix in and firm up the consistency a little. Conversely, if it's too DRY to stick to your little fingers, sprinkle some water on as you knead 'til it's about the right texture - something like Play-Doh.) (Don't forget to wash your hands before you start this recipe, including under your filthy little fingernails, you scab.)
Put dough in lightly greased bowl, turn to coat all sides, cover and put in warm, draft-free place to rise for about 1 hour.
When dough has risen, knead lightly to push out air and divide into small pieces (about 10-12). (Ali note: Whoever wrote this recipe was high if they thought this amount of dough makes 10-12 of these things, the size of which would cook in 15 minutes. I ended up with closer to 18, and still needed a little longer in the oven.)
Using the hands, roll each small piece into a strip about 8 - 10 inches long. Shape each strip into an 'S' or a figure 8. (Ali note: For authentic look, place a raisin or currant in the dimples of each bun.)
Place on lightly buttered cookie sheets. Cover with clean cloth and let rise again, about 1 to 1 1/2 hours.
Preheat oven to 375°F.
When dough has risen, brush lightly with egg white.
Bake in preheated 375° F oven for 15 minutes, or until lightly browned (which was a bit longer than 15 minutes).
Let cool on wire rack.

GLÖGG
(Um... Glögg)

As noted above, you can make glögg in nearly any way you choose. This is my favorite amalgamation:
INGREDIENTS
1 bottle dry red, such as Cabernet Sauvignon
1 cup brandy
3-4 cinnamon sticks
6-8 cloves
1-2 teaspoons ground cardamom (ideally you use 3-4 whole caramom pods, cracked, but good luck finding those in most grocery stores)
1 tablespoon dried orange peel (or the peel of 1 whole orange)
1/3 cup sugar (ideally brown, but if you're scrimping and just have white, go for it!)
Currants or raisings
Almond slivers
PREPARATION
Simple: Heat. On the stove. For at least 45 minutes. Don't let it reach 170 or so (that means keep it just at steaming and below simmering), unless you want nonalcoholic glögg. A clean meat thermometer is handy for this purpose.
Put a small handful of currants (or raisins) and almond slivers at the bottom of each glass.
Pour the glögg into your glasses through a sieve to strain out the cloves and such, and enjoy.

Skål!

KÖTTBULLAR
(Swedish Meatballs)

I made this with 2 lbs. ground beef (you can also use veal with the beef, about 1/3 to 1/2 the total amount of meat; that's how the restaurants usually do it) instead of 1 1/3 lbs., which is what the original recipe called for. Watching *me*, the literature nerd, try to figure out that sort of conversion? Must have been priceless. I had to appeal to my civil engineer father for guidance. This is what he came up with:
INGREDIENTS
1/2 cup plain breadcrumbs
1/2 cup milk
1 medium yellow onion, finely diced
1 egg plus 1 egg white
2 lbs. pounds lean ground beef (But for goodness sake, not too lean.)
1/2 tsp salt
1/4 tsp pepper (Most recipes call for white pepper, but this one doesn’t differentiate; I used white)
1/2 tsp allspice
1 tbs butter
1 tbs extra-virgin olive oil

PREPARATION (The "real" way)
Soak breadcrumbs in milk for 5 to 10 minutes until the liquid is absorbed.
To a bowl add onion, egg, ground beef, soaked bread crumbs, all spice, salt and pepper.
Mix all the ingredients together with your hands and shape the meat mixture into small balls, less than an inch in diameter. If the mixture starts to sticks to your hands, wet them with cold water.
Heat a skillet with butter and extra virgin olive oil.
Sauté the meatballs in 3 or 4 batches, turning them frequently to keep the meatballs from sticking. Drain them on paper towels.
Drain the excess olive oil and scrape off and discard any browned bits of meat that may be sticking to pan after the meatballs are done.
To the same pan add butter and flour and stir until it browns.
Quickly add a can of beef stock and bring to a boil, stirring constantly until gravy thickens.
Remove from the heat and serve immediately with the meatballs.

PREPARATION (The weenie way)
Preheat the oven to 400°F.
After you've formed the meatballs as described above, place in a lightly greased, uncovered Pyrex dish.
Cook for about 10-20 minutes, depending on the size of the meatballs; eyeball it and do a touch-test to test for doneness. Rotate halfway through so the entire sphere gets browned as it would have in a frying pan.
Remove from pan, and drain on paper towels; keep warm after draining.
Use pan scrapings to make gravy as described above, adding extra beef broth or stock to increase volume as necessary.


(Sorry for the freaky lighting. Still getting the hang of this new camera!)

Enjoy your Swedish feast, you crazy Vikings! } :- )

(That's clearly a Viking helmet, BTW.)

(Shaddup.)

Wednesday, November 19, 2008

Ali's Kitchen: Potato and Leek Gratin With Cumin

It's cold. My head hurts. It's the perfect time for this dish. This recipe for potato and leek gratin with cumin comes directly from the "Recipes for Health" feature of the New York Times Health section, ironically not the Dining & Wine section. At first glance you (depending on your cultural baggage) might think, "Potatoes? Gratin? What is this doing in 'Recipes for Health?'" Well, here's why:

Cheese isn't bad for you! Neither are potatoes! Calcium and protein. Fiber and potassium. THE. END.

Well, not The End, obviously, but let's point something out: This recipe uses less than 1 cup of Gruyère, in a dish meant for 6-8 people. You can use even less cheese, if you like, and you'll still get the creamy effect. That's hardly a lot of dairy fat. And, since this is from the Health section, they've substituted the cream that's in many gratins for lowfat milk. Works just fine everytime, and your tummy (if it's sensitive) will thank you. Herewith, the text of their recipe, interspersed with pictures from Carlita Canon:

INGREDIENTS
1 garlic clove, cut in half
1 tablespoon extra virgin olive oil
1 pound leeks, white and light green parts only, cut in half lengthwise, sliced and rinsed of sand
Salt and freshly ground pepper
1 teaspoon cumin seeds, lightly toasted and crushed in a mortar and pestle or a spice mill (I had cumin seeds as well as ground cumin, but not a mortar/pestle or spice mill. I just used the ground cumin.)
2 pounds russet potatoes or Yukon golds, peeled if using russets, scrubbed if using Yukon golds, and sliced 1/4 inch thick
(I'm using red potatoes because for some bizarre reason, that's all the grocery store had. I think I also bought more than 2 lbs - our grocery doesn't have a scale, oddly enough - because this practically overflowed my 2.2 lb casserole.)
3 ounces Gruyère cheese, grated (3/4 cup, tightly packed)
2 1/3 cups low-fat milk

PREPARATION
1. Preheat the oven to 375ºF. Rub the inside of a 2-quart gratin or baking dish with the cut side of the garlic clove. Brush lightly with olive oil.
2. Heat the remaining olive oil in a wide, heavy nonstick skillet over medium heat and add the leeks. Cook, stirring often, until tender, for about 5 minutes. Add 1/2 teaspoon salt and freshly ground pepper to taste and stir in the crushed cumin seeds. Stir together for half a minute and remove from the heat.
3. Place the potatoes in a large bowl and season generously with salt and pepper. Add the leeks mixture and half the cheese, and toss together. Arrange in the baking dish in an even layer. Pour in the milk.


Place the baking dish on a baking sheet and place in the oven.
4. Bake the gratin for 45 minutes, checking after 30 minutes and pressing the potatoes down into the milk with the back of a spoon. At 45 minutes, remove the dish from the oven and again press the potatoes down into the liquid. Sprinkle the remaining cheese over the top and bake for another 30 to 45 minutes, or until nicely browned. Remove from the heat and allow to sit for 10 to 15 minutes before serving.

There you have it! In retrospect, I would add that:

- Putting a cookie sheet under the pan is helpful, in case the milk boils over in your small casserole;
- Possibly cover the top with aluminum foil for at least part of the early cooking so it doesn't get too brown. The color doesn't make a difference in the AWESOME taste, but if you need to serve this to someone other than your living partner, it might be a nice touch.


The article means this recipe for a vegetarian main dish , but we are having it with sautéed chicken breasts, whipped up while the gratin is cooling. Simply:

1. Rinse, pat dry, lightly salt and pepper the chicken, etc. and so forth with your basic prep.
2. Dredge the breasts through some milk, then through some flour mixed with coriander, paprika, and garlic powder, just to keep things interesting.

Coriander and paprika are fun with the cumin, but use your own favorite spice here.

3. Preheat some olive oil or butter or both in the UNWASHED pan you used for the leeks.

4. Sauté about 5-7 minutes per side (totally depends on the size of the breasts).

(If you use GARGANTUAN chicken breasts like some of us, then when both sides are brown and they STILL aren't done, take the gratin out to cool and put the chicken in the oven in its place, in either a 400-degree-safe pan, or in another casserole. If your chicken breasts are big enough that 8 minutes per side didn't do it in the pan [these are the Frankenstein breasts about whose growing process I'd like to keep in the dark], then at least 10 minutes still at that 375ºF should do it. If you're hopeless at cooking poultry, like I am, then a meat thermometer always helps.)


Boom. Dinner. Le yum yum.

Sunday, September 7, 2008

Ali's Kitchen: Classic, First-Anniversary-Friendly White Cake

Beginner's Baking Tips

1. Have a kitchen that's bigger and has more counter space than this one:

2. It seems that you really do get what you pay for where baking supplies are concerned. For instance, a) definitely get a better mixer than this one:

Sigmund says I have Cuisinart envy.

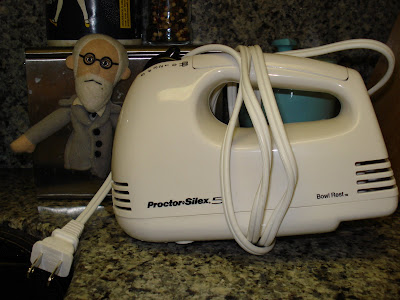
Otherwise, your mixer's speeds will be: Manic Housecat, Autobahn, and Nascar. Not necessarily optimal. b) Have a spatula that is not a piece of cheap crap. Otherwise, it will snap in two - that's right, in two - during mixing. That was fun. c) On the plus side, you know what's magical? Williams-Sonoma Nonstick Goldtouch™ bakeware. It let even a baking novice/ignoramus like myself - whose cake ended up cooking a looong time - completely avoid cake sticking to the pan. Not only that, the cake separated from the pan like buttah. Since I used Pam for Baking instead of butter and flour, and since Pam for Baking is just awful, I have to credit the Williams-Sonoma pans with this success. The cooling rack from the same line is also great.

3. Have a full set of mixing bowls. Deep ones. I have one (1) deep mixing bowl. I have a bunch of big-to-medium, but shallow, bowls that, I thought, would double as "mixing" bowls. Here's the funny thing: Mixing in a shallow bowl will leave you with splatters at interesting spots on the wall, refrigerator, your hair, your cat, you get the picture. Hence, you will be forced to hand-mix. Hence, you will end up with some great upper body exercise:

Wow. What a bicep I've got there.../sarcasm

But a really long mixing process. Related problem: Having to reuse the same bowls (and wash, and dry them) will mess up your timing, which in baking is important.

4. For the love of all that is shiny and pretty, use real eggs to get your egg whites. Don't use egg white from a box. Otherwise? You will be left completely at a loss when trying to figure out the measurements for "whites of 8 large eggs."

That is an odious lie.

And then, sadly, you'll end up using too much egg, like I did, and thus end up with eggy cake. While not the worst thing in the world, it's... eggy. We were going for cake, not a French patisserie bread.

5. While cooling, don't touch. If need be, stand guard to ward off those in your house with a Y chromosome, or those who are under 15 years of age. Related: Don't frost until FULLY COOLED. Otherwise, slide, boom, splat, mayhem, woe.

6. Even if the cake is a little eggy, enjoy.

(Yum yum. And yay ^_^)

Here's the actual recipe:

White Cake, Joy of Cooking, page 937
Have all ingredients at room temperature, 68 to 70 degrees F. Preheat the oven to 375. Grease and flour three* 8x2-inch round pans or line the bottoms with wax or parchment paper. Sift together twice:

3 1/2 cups sifted cake flour**
1 tablespoon plus 1 teaspoon baking powder
1/2 teaspoon salt

Combine:

1 cup milk
1 teaspoon vanilla
1/4 teaspoon almond extract (optional)

In a large bowl, beat until creamy, about 30 seconds***:

1 2/3 cups sugar

Add the flour mixture in 3 parts, alternating with the milk mixture in 2 parts, beating on low speed or stirring with a rubber spatula until smooth and scraping the sides of the bowl as necessary. In another large bowl, beat on medium speed until soft peaks form:

8 large egg whites
3/8 teaspoon cream of tartar
Gradually add, beating on high speed:
1/3 cup sugar

Beat until the peaks are stiff but not dry****. Use a rubber spatula***** to fold****** one-quarter of the egg whites into the butter mixture, then fold in the remaining whites. Divide the batter among the pans and spread evenly. Bake until a toothpick inserted into the center comes out clean, about 25 minutes. Let cool in the pans on a rack for 10 minutes. Slide a thin knife around the cake to detach it from the pans. Invert the cake and peel off the paper liners, if using. Let cool right side up on the rack. Fill and frost as desired.

*Somehow I missed this key detail. Which would explain why they turned out... huge. And took so long. Am an idiot. Then again, let's be honest: How annoying would adjusting all the measurements be? I got an 800 in my verbal SAT portion, not the math, and that sort of multiplication is just BEYOND me this far out of high school.

**I used all-purose white flour, because I figure that's why it's called "all purpose."

***If you're using an electric mixer, you lucky jerk.

****Yeah, I'm lazy, and didn't actually do this. It doesn't appear to have mattered.

*****If you still have one.

******WTF is "folding?" I don't care. I stirred. It's fine.